If you’re a new parent or expecting a baby, one of the most exciting things to do is to prepare the nursery for your little one. A fresh coat of paint can make all the difference in transforming a plain room into a cozy and inviting space for your baby. However, painting a baby’s room can be daunting, especially if you’re not experienced in DIY projects. In this article, we’ll share some tips and tricks on how to paint a baby’s room, from choosing the right color to applying the paint correctly.
Choosing the Right Color
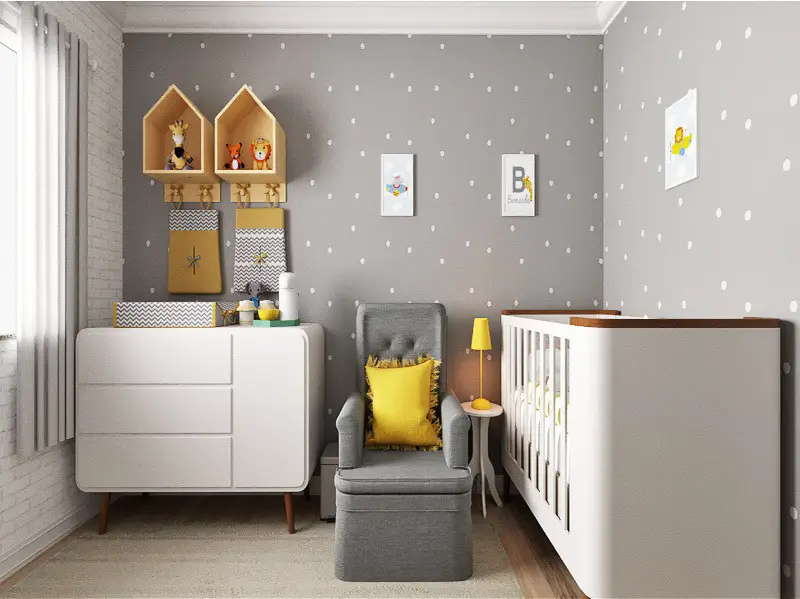
When choosing the right color for your baby’s room, consider the overall mood and atmosphere you want to create. Soft and muted colors are often recommended for a calming and soothing environment, which can help promote better sleep and relaxation for your baby. Pastel shades like lavender, baby blue, and pale pink are popular choices, as they can create a serene and tranquil space.
Neutral colors like white, gray, and beige are also good options for a baby’s room, as they can easily match with other décor and accessories. These colors also provide a clean and sophisticated look, which can be a great canvas for adding accents and pops of color. Neutral colors can also help create a gender-neutral space, which can be a good choice if you’re planning on having more children in the future.
If you’re looking to add a bit more personality to your baby’s room, you can also consider bolder colors like bright pink, blue, or green. However, it’s important to use these colors sparingly and not make them too overwhelming. Consider using them as accents or on a single feature wall, rather than painting the entire room in a bright color.
When choosing a paint color for your baby’s room, it’s also important to consider the paint’s finish. Matte or eggshell finishes are popular choices for a baby’s room, as they provide a smooth and even finish without any shine or reflection. These finishes are also less likely to show imperfections or blemishes on the walls.
Preparing the Room
Preparing the room before painting is an important step to ensure a successful and stress-free painting process. To start, remove any furniture, toys, or decorations from the room that could get in the way or be damaged by paint splatters. This will also make it easier to move around and paint all areas of the room.
Next, cover the floor and any remaining furniture with a plastic drop cloth or old sheets to protect them from any paint drips or spills. Make sure the covering is secured and not at risk of slipping or moving during the painting process.
If there are any holes or cracks in the walls, use spackle to fill them in and sand them down until smooth. This will help create an even surface for the paint to adhere to and prevent any imperfections from showing through the finished paint job. Once the spackle is dry and sanded, wipe the walls down with a damp cloth to remove any dust or debris.
Before painting, it’s also a good idea to clean the walls thoroughly to ensure the paint adheres properly. Use a gentle cleanser or solution of water and vinegar to remove any dirt or grime. Let the walls dry completely before starting to paint.
Finally, make sure you have all the necessary supplies for painting, including paint brushes, rollers, paint trays, and of course, the paint itself. Follow the instructions on the paint can for mixing and application, and consider using a primer if needed for better coverage and adhesion.
By taking the time to properly prepare the room, you can ensure a smooth and successful painting process, and create a beautiful and welcoming space for your baby.
Gathering the Right Tools
To paint a baby’s room, you’ll need several tools, including:
- Paint rollers and brushes of various sizes
- Paint tray
- Painter’s tape
- Sandpaper
- Putty knife
- Drop cloth
- Paint scraper
- Cleaning supplies (soap, water, rags)
Buying the Right Type of Paint
Choosing the right type of paint is crucial when painting a baby’s room, as you want to ensure that the paint is safe and healthy for your baby. When selecting paint, there are a few things to keep in mind.
First and foremost, look for paint that is labeled as low or zero VOC (volatile organic compounds). These types of paint are free of harmful chemicals and toxins that can be harmful to your baby’s health, particularly their respiratory system. VOCs can cause headaches, nausea, and even long-term health problems, so it’s important to choose a paint that’s free of them.
In addition to being low or zero VOC, you’ll also want to choose a paint that’s easy to clean. Babies can be messy, so it’s important to have a paint that can withstand frequent cleanings without fading or chipping. Look for paint that’s labeled as washable or scrubbable, which means it can be wiped down with a damp cloth without damaging the finish.
When it comes to color, there are many options to choose from. Soft, muted colors such as pastels are popular choices for baby’s rooms, as they create a calm and soothing atmosphere. However, don’t be afraid to choose bolder colors if that’s your preference. Just make sure to choose a shade that’s not too bright or overwhelming, as this can overstimulate your baby and affect their sleep.
Before purchasing the paint, make sure to read the label and instructions carefully. Follow the manufacturer’s recommendations for application and drying time, and ensure that you have all the necessary tools and supplies, including brushes, rollers, and trays. By selecting the right type of paint, you can create a beautiful and safe environment for your baby to grow and thrive in.
Painting Techniques
Now that you’re ready to paint, let’s look at some techniques to help you achieve a flawless finish.

Cutting In
Cutting in is an important step in painting any room, including a baby’s room. It involves using a paintbrush to create a border around the edges of the room, including the corners, ceiling, and baseboards. This helps to create a clean and crisp edge that makes the room look professionally painted.
To start cutting in, you’ll need a paintbrush that’s the appropriate size for the job. For most baby’s rooms, a 2-3 inch brush should be sufficient. Dip the brush into the paint, and then tap off any excess paint on the side of the can. This will help to prevent drips and ensure a smooth application.
Next, use painter’s tape to create a straight line where the wall meets the ceiling, corners, and baseboards. This will help to keep the paint from bleeding onto the adjacent surfaces and create a professional-looking finish. Press the tape down firmly, making sure there are no bubbles or gaps.
Once the tape is in place, use the paintbrush to paint along the edges of the room, starting with the ceiling and working your way down to the baseboards. Use long, smooth strokes, and be sure to overlap the border slightly to ensure complete coverage.
After you’ve finished cutting in, let the paint dry completely before moving on to the next step. This may take a few hours or longer depending on the type of paint and the humidity in the room. Once the paint is dry, carefully remove the painter’s tape to reveal a clean and crisp edge.
Rolling the Paint
After you’ve cut in the edges of the room, it’s time to start rolling the paint onto the walls. This step is important to cover larger surface areas quickly and efficiently.
First, you’ll need to prepare the roller. Dip it into the paint tray and then roll it back and forth to remove any excess paint. This helps to prevent drips and ensure an even application of paint.
Start rolling the paint onto the wall using long, vertical strokes. Begin at the top of the wall and work your way down to the baseboards. Try to maintain a consistent pressure and speed to ensure even coverage.
Once you’ve finished one section of the wall, use the roller to blend the edges of the previous section with the new one. This helps to avoid visible lines and create a smooth finish. Continue to work your way around the room, section by section, until the entire room is painted.
Be sure to take breaks as needed to avoid becoming fatigued, especially if the room is large or if you’re painting multiple coats. Allow each coat of paint to dry completely before applying the next one. This will help to ensure a smooth and even finish.
When you’ve finished painting, let the room dry completely before removing any protective coverings from the floor or furniture. Then, take a step back and admire your newly painted baby’s room!
Blending the Paint
Blending the paint is an important step in achieving a smooth and even finish for your baby’s room. After you’ve rolled the paint onto the wall, you may notice streaks or areas where the paint looks uneven. This is where blending comes in.
To blend the paint and avoid streaks, you’ll need to use a dry roller. First, remove any excess paint from the roller by rolling it back and forth on a piece of cardboard or other disposable surface. Then, use the dry roller to lightly roll over the painted area in a vertical direction. This helps to distribute the paint evenly and remove any excess paint, ensuring a smooth finish.
Be careful not to press too hard or roll over the same area too many times, as this can create new streaks or cause the paint to lift off the wall. Take your time and work slowly and methodically, focusing on one section of the wall at a time.
If you notice any areas that still need blending after the paint has dried, you can touch them up with a small brush or roller. Be sure to feather the edges of the new paint into the surrounding area to avoid creating visible lines.
With a little practice and patience, you can achieve a beautiful and smooth finish for your baby’s room that will make you proud.
Adding a Second Coat
Adding a second coat of paint is important to ensure a smooth and even finish, especially if the first coat didn’t cover the walls completely or if you want to create a deeper color. To add a second coat, follow the same cutting in and rolling techniques as before. However, this time you can use a slightly heavier coat of paint. Make sure to let the first coat dry completely before adding the second coat, which typically takes around 2-4 hours depending on the type of paint and humidity level in the room.
It’s important to note that not all paints require a second coat, so make sure to check the manufacturer’s instructions before adding the second coat. If you’re unsure whether you need a second coat, you can always do a test patch in a small area and evaluate the coverage.
Cleaning Up
It’s important to clean up any messes and drips immediately after you’ve finished painting to prevent damage to your floors or furniture. If you’ve used a plastic drop cloth or old sheets to protect your flooring, carefully fold them up and dispose of them in a trash can. You can use a damp cloth to wipe down any remaining surfaces and remove any paint splatters.
Next, it’s time to clean your painting supplies. Use warm soapy water to clean your brushes and rollers thoroughly, making sure to remove any excess paint. Rinse them well under running water and allow them to air dry. Store your brushes and rollers in a dry and safe place for future use.
Finally, take a step back and admire your hard work! You’ve successfully painted your baby’s room, and you should feel proud of your accomplishment.
Decorating the Room
When it comes to decorating your baby’s room, there are a variety of options to choose from. Wall decals can add a fun and playful touch to the room, and they’re also easy to remove and replace as your baby grows older. Artwork, such as framed prints or canvases, can also add some personality to the room and create a focal point.
Another popular decorating option is a wallpaper accent wall. This is a great way to add a pop of color or pattern to the room without overwhelming the space. Just make sure to choose a wallpaper that’s easy to clean and doesn’t have any harmful chemicals.
In addition to decorations, don’t forget to add some functional items to the room. A crib is the most important piece of furniture in the room, so make sure to choose a safe and comfortable option for your baby. A changing table can also be a convenient addition, as it provides a designated area for diaper changes and storage for diapers and other baby essentials.
Lastly, consider adding a comfortable rocking chair or glider to the room. This can be a great spot for you and your baby to bond and relax, especially during late-night feedings or snuggles. Look for a chair with a supportive back and armrests, and consider adding a footrest for added comfort.
Safety Tips
In addition to proper ventilation and wearing a mask, there are other safety tips to keep in mind when painting a baby’s room. Be sure to read the label on the paint can and follow any specific instructions or warnings. Avoid using paint sprayers, which can create a fine mist that can be harmful if inhaled.
When painting, use a sturdy ladder or step stool to reach high areas, and make sure it’s placed on a stable surface. Never leave the room while the paint is wet, and keep all windows and doors closed until the paint is completely dry to avoid any accidental smudging or touching.
If you’re pregnant or have a baby, it’s best to have someone else do the painting for you, and avoid being in the room during the painting process if possible. It’s also important to keep your baby’s toys and other items out of the room until the paint has dried completely, and to wash any bedding or clothing that may have come into contact with the paint.
By following these safety tips, you can ensure that your baby’s room is not only beautiful but also safe and healthy.
Common Mistakes to Avoid
- Skipping the prep work: Failing to prepare the room and walls properly can lead to a messy and uneven finish.
- Choosing the wrong type of paint: Using paint that contains harmful chemicals can pose a health risk to your baby.
- Not applying enough coats: Applying only one coat of paint can result in an uneven finish, so make sure to apply at least two coats for a smooth result.
- Rushing the job: Taking your time and following the correct techniques can ensure a flawless finish.
Frequently Asked Questions (FAQs)
- How long should I wait before painting a baby’s room?
- It’s recommended to wait at least two weeks after the baby is born before painting the room, to allow for any potential respiratory issues to subside.
- Can I use regular paint for a baby’s room?
- No, it’s important to use low or zero VOC paint to ensure your baby’s safety.
- Should I paint the ceiling too?
- It’s recommended to paint the ceiling to avoid any visible contrast with the walls.
- Can I paint the room myself or should I hire a professional?
- It’s possible to paint the room yourself, but it’s important to follow the correct techniques and prioritize safety. Hiring a professional can ensure a flawless and efficient finish.
- How often should I repaint a baby’s room?
- It’s not necessary to repaint the room frequently, but it’s a good idea to touch up any scuffs or stains that may occur over time.
Conclusion
Painting a baby’s room can be a fun and rewarding experience, but it’s important to prioritize safety and follow the correct techniques to ensure a flawless finish. From choosing the right color to applying the paint correctly, these tips and tricks can help you create a cozy and inviting space for your little one.